How to Use SSH Keys with Your VPS

What are SSH Keys?
Linux servers are by default secured by a password. However, this type of authentication is not ideal from a security standpoint because your server can be vulnerable to Brute-Force, or dictionary attacks. SSH Keys are a secure login method when using SSH. Instead of a password, the procedure uses a cryptographic key pair for validation. Although using a strong password helps prevent brute force or dictionary attacks, public key authentication provides cryptographic strength and automated password-less logins.
SSH Keys vs. Passwords:
As stated in the introduction of this article, the problem with passwords is their vulnerability to Brute-Force, or dictionary attacks. Although the security of passwords can be extended by using longer passwords or special characters and numbers, the risk of brute-force-attacks is still there. During a brute-force-attack, an automated program generates random passwords and tries to login into your server. Depending on the program itself and the performance of the machine on which this program is running such an attack can be successful in no time.
SSH Keys on the other hand are created by using the RSA-Cryptosystem. An asymmetric cryptographic system. Two keys, the public key, and the private key are generated. The method used to create these keys is so complicated that it is impossible to brute force or crack it.
SSH Key Authentication Explained:
- An SSH Key pair, which includes a public and a private key is generated.
- The public key is saved on your server; the private key is saved on your computer.
- If you now try to login into your server, the server will generate a random string and encrypt it using the public key. This encrypted string can only be decrypted using the private key.
- The server sends this encrypted string to your computer. Your computer will decrypt it with the private key and sends the decrypted string back to the server.
- If the decrypted string from your computer matches with the original string from the server, you are authorized and granted access to the server.
Generating SSH Keys:
This how to is assuming that you are logging in to a server as the root user, these instructions will work with any user configured on the system, just replace /root with /home/<username>
Linux
- If your local computer runs Linux, open a terminal.
- Enter the following command to generate a pair of keys:
ssh-keygen -t rsa - Depending on your version of Linux you may be prompted to choose a filename and a destination where the file should be saved.
- The default path in which the keys are saved it: /root/.ssh
While id_rsa is your private key, id_rsa.pub is your public key.
Windows
If your running Windows as your Desktop, you will need PuTTY, which includes the PuTTYgen program that is installed as part of the PuTTY .msi package installation
You can download PuTTY here: And instructions to install it can be found here:
Once you have Putty installed or if you already have installed all you need to do is
Go to Windows Start menu → All Programs → PuTTY → PuTTYgen.
After opening it, this screen will appear:
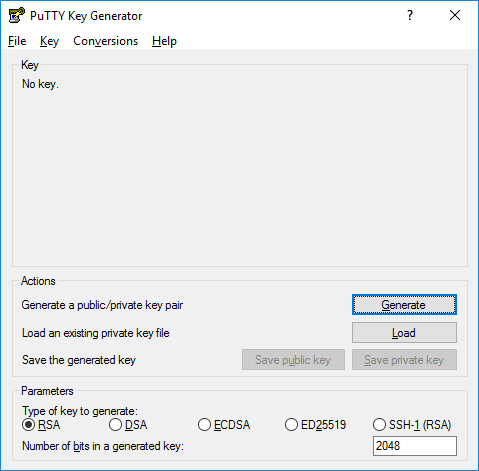
Just click on Generate, and start moving the mouse within the "Key" Window. Putty uses mouse movements to collect randomness. The exact way you are going to move your mouse cannot be predicted by an external attacker. You may need to move the mouse for some time, depending on the size of your key. As you move it, the green progress bar should advance.
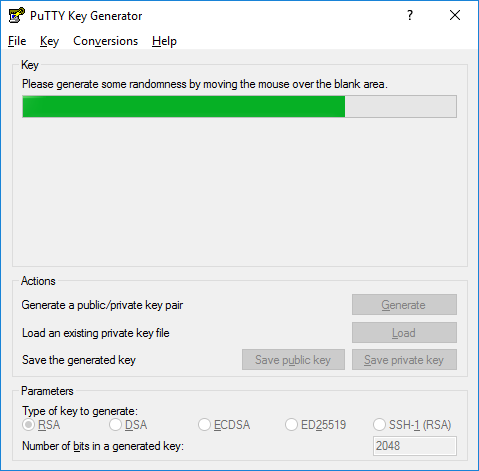
Once the progress bar becomes full, the actual key generation computation takes place. This may take from several seconds to several minutes.
Your keys will then be generated, when complete the public key should appear in the Window.
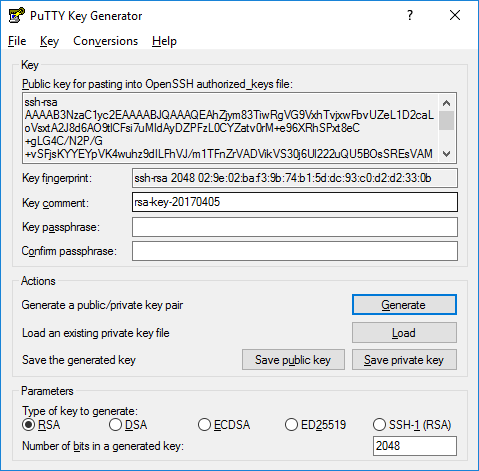
You should save at least the private key by clicking Save private key.
Key Passphrase Explained (optional, recommended)
To increase the private keys security, you can assign a key passphrase. This will locally encrypt your private key. If you now try to connect to your sever using your private key you will be prompted to enter your key passphrase. The difference between using a normal password to connect to your server or using a private key secured by a passphrase is, that the passphrase won’t be transferred to your server. The passphrase is only used to encrypt/decrypt your private key locally. With this method it doesn’t matter if anybody gains access to your private key because they also need your key passphrase to connect to your server.
To save the public key you can either copy the whole text of the top box or click on “Save public key” followed by choosing a location in which the key should be saved.
To save the private key click on “Save private key” and choose a location in which the key should be saved.
Uploading your Public Key to the Server:
After the pair of keys have been created, you need to upload the public key to your server. This can either be done by using an FTP/SFTP program or by console via SSH.
I use FileZilla with this how to as it works on any platform, there are other programs that can be used like WinSCP, Cyberduck and CoffeeCup to name a few, but it's up to you as to the one you want or like to use
via FTP/SFTP
If you want to upload your public key using FTP/SFTP, start your FTP/SFTP program and connect to your server as root.
.ssh
Now create a text file called authorized_keys in the .ssh folder by clicking on the .ssh folder, and select Create new file.
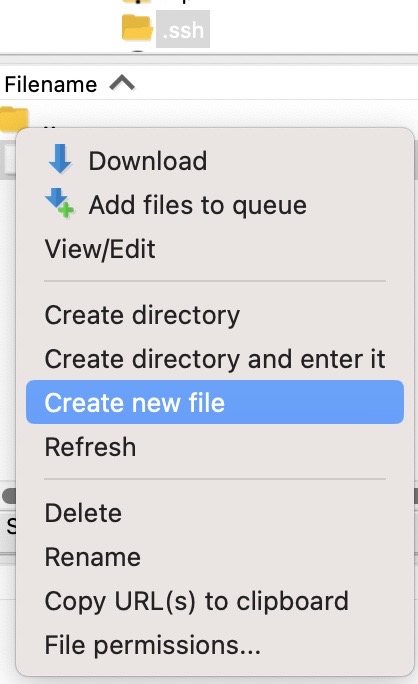
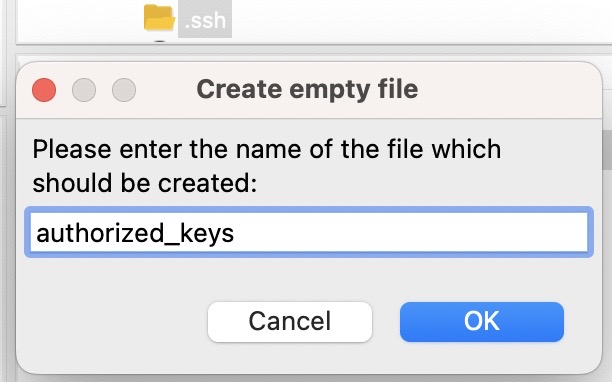
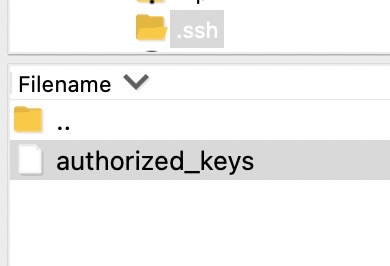
Select OK and you should see "authorized_keys" listed as one of the files
now right click on authorized_keys and select View/Edit
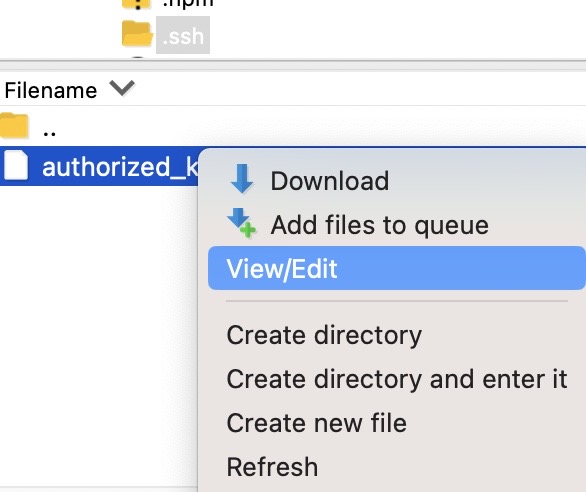
In the box that opens copy/paste your whole public key into it, and then save the file.

Once you've done that you should be automatically prompted to save and upload the file back to the server, just select Yes

Be sure to set the file permissions to 600 on the authorized_keys file, by first left clicking on the file to highlight it and then right clicking and selecting File permissions...
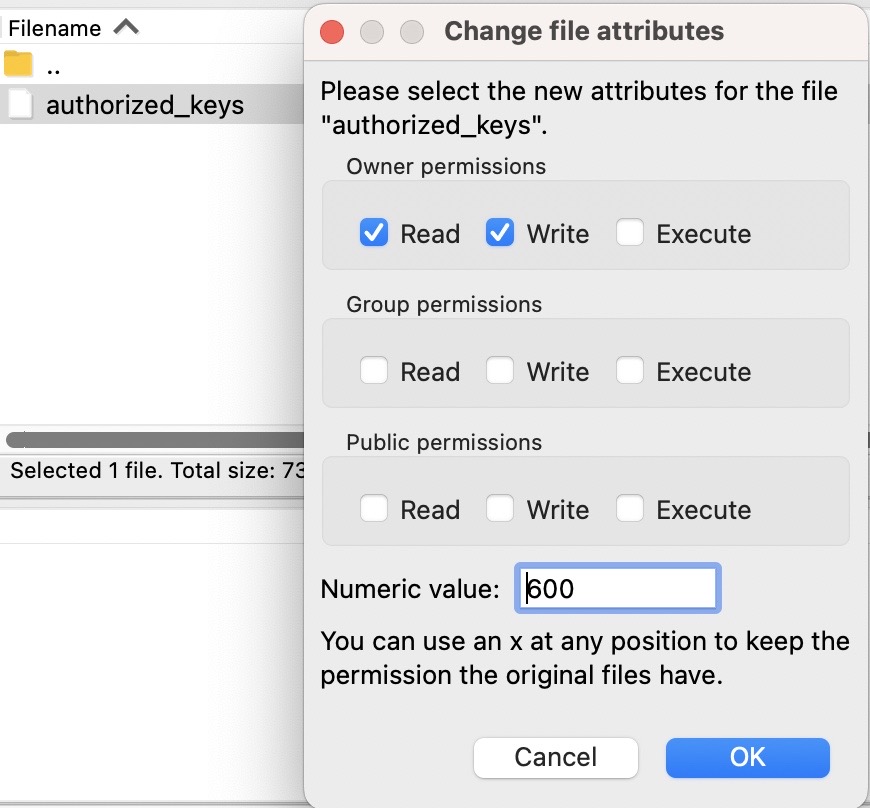
Select OK once your done.
via Console
Log yourself in to your server via SSH as root, and cd to .ssh:cd /root/.ssh
Now create and open the authorized_keys text file with this command:nano authorized_keys
Paste in your whole public key and save the file by pressing "CTRL+O". To exit the editor use "CTRL+X"
Set the file permissionschmod 600 /root/authorized_keys
How to Use Your Private Key with PuTTY:
After you’ve created a key pair consisting of a private key and a public key and after uploading your public key to your server you need to insert your private key into PuTTY.
To do so open PuTTY.
On the left side you will find a list with various categories. Under Connection you will find the submenu SSH which can be expanded by clicking on the little plus-symbol [+]. Now click on Auth. A window will appear on the right side. Click on Browse… and select your private key.
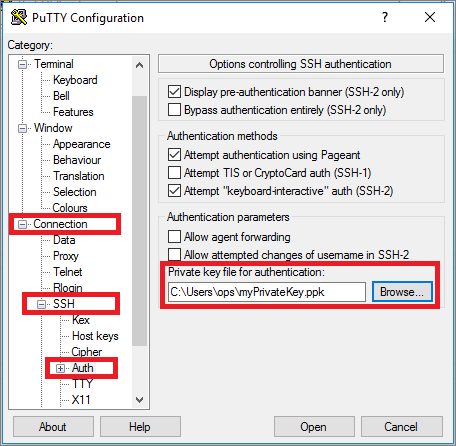
Now scroll up on the left list and click on Session.
Enter your server’s IP-Address and choose a profile name in the Saved Sessions field.
Save your profile by clicking on the Save-Button.
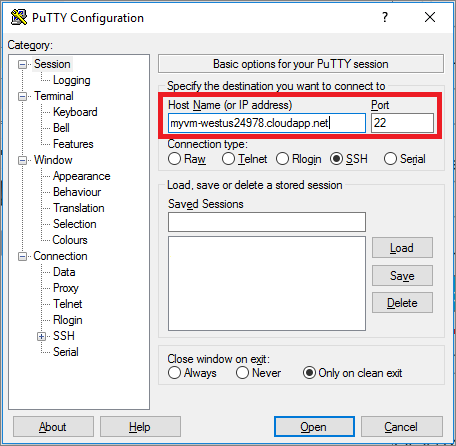
Now you’ve created a profile in PuTTY with your private key.
How to use your Private Key with Pageant:
Alternative to inserting your Private Key into PuTTY you can use Pageant, Pageant is an SSH-Agent, which comes with PuTTY. With this program it’s easier to use Private Keys to connect to your server. If you use Pageant you don’t need to type in your Passphrase over and over again, in case you secured your Private Key with a Passphrase.
To start Pageant from the PuTTY folder: Start-Menu → All Programs → PuTTY → Pageant
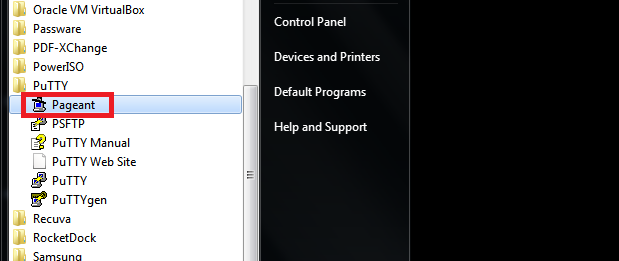
Pageant starts by default minimized in the system tray. To begin adding your SSH keys, you should right click on its icon and then the following context menu will show up:
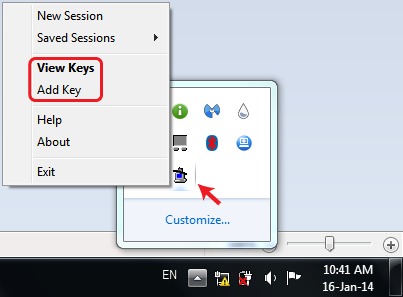
To import a Private Key into Pageant, right-click the Pageant-Icon and click on "View Keys" or “Add Key”.
The file explorer will open up the Pageant Key List window. Here you can view, add, and remove keys:
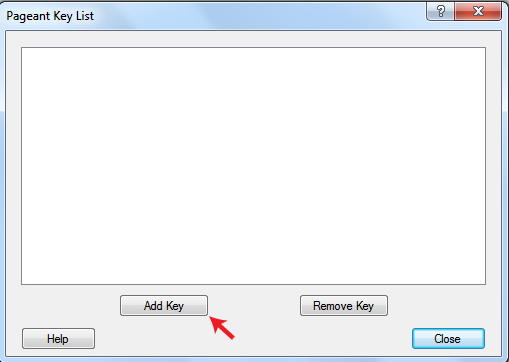
Click the Add Key button. This will open the file explorer, where you can choose one or more keys at a time to load. You should select files with the .ppk extension:
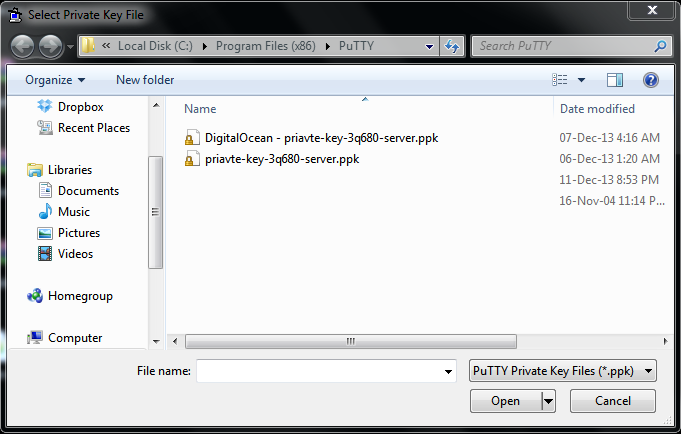
Highlight the key you want to add and click the Open button to load the keys with Pageant.
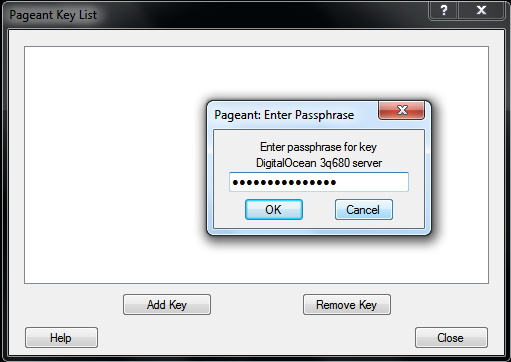
If a key is passphrase-protected, you will be prompted to enter the passphrase only once before it can be added to the Pageant Key List:
After successfully adding a key, you should now see it listed:
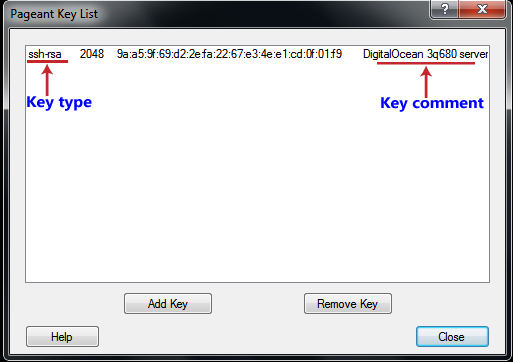
Now you can just login to your Server without getting prompted to enter your Passphrase every time you start an SSH connection.
Now these keys will be available while connecting to any server during your PuTTY sessions. You don’t have to take any extra steps in PuTTY. Just enter your hostname or IP address, and SSH user. PuTTY will automatically try to authenticate using any keys currently loaded in Pageant.
If you want to remove a key from Pageant, select that key from the Pageant Key List window and press the Remove Key button. You can also remove multiple keys together by selecting them with CTRL or SHIFT.
Testing SSH Key Authentication and Disabling Password Authentication:
After you’ve successfully generated a key-pair, uploaded your public-key on the server and created a PuTTY-Profile with your private-key it’s now time to test if your new login method is working.
Testing SSH Key Authentication
To test if your new authentication method is working just login to your server using the PuTTY profile you’ve just created. After double-clicking on the profile, a console will open prompting you to enter your username which in this how to is root.
After entering the username and confirming it by pressing [Enter] you will be logged in. Besides that, the following message will appear during the login process:
“Authenticating with public key <key comment>”.
Disabling Password Authentication
The reason behind choosing ssh-key authentication as your login method is server security. Therefore, it’s logical to disable password authentication now.
You can edit the sshd_config file and set these lines to no by using nano, vi or vim:nano /etc/ssh/sshd_config
Set these following values to “no”:
ChallengeResponseAuthentication
PasswordAuthentication
or you can run these sed commands
sed -i 's/PasswordAuthentication yes/PasswordAuthentication no/g' /etc/ssh/sshd_config
sed -i 's/ChallengeResponseAuthentication yes/ChallengeResponseAuthentication no/g' /etc/ssh/sshd_config
While using nano to avoid scrolling through the whole config to find the values that need to be changed you can open a search-field by pressing [CTRL+W]. Enter the name of the value and press enter.
If the values are commented out by a # in front of it, just remove it. Save your changes with [CTRL+O] and close the editor with [CTRL+X] and restart sshd
Restart the sshd service with this command:systemctl restart sshd
Removing SSH Key Authentication and Re-enabling Password Authentication:
If you want to go back to password authentication all you need to do is change the values in the /etc/ssh/sshd_config back to “yes”.
Then delete the .ssh/authorized_keys file with:rm ~/.ssh/authorized_keys
And restart the sshd service:systemctl restart sshd


Comments